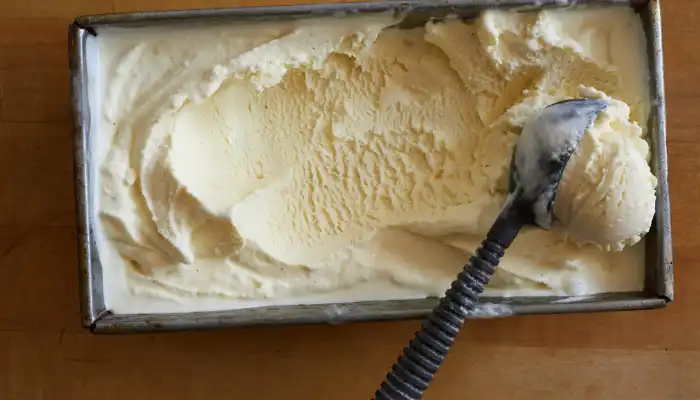
It is just the expression ‘homemade ice cream’ that brings to mind these images of warm-season hedonism, with scoops of cold and creamy magic feasts enjoyed on sunny afternoons. But achieving that perfect texture, the velvety smoothness that makes great ice cream truly great can sometimes feel like a secret science. Fear not, my friends who love ice cream! This article will reveal how to make creamy homemade ice cream, so you can treat yourself to tasty balls rather than store-bought ones.
Why Does Creaminess Matter In The Homemade Ice Cream?
This frozen treat’s overall indulgence is enhanced by the creaminess of homemade ice cream. It is all about the taste as well as the texture. When we plunge our spoons into a bowl of ice cream, we expect it to be smooth, rich, and velvety in our mouths. Adding some milk fat to an extremely churned mixture creates a luxurious texture for an enjoyable bite.
One reason why creaminess matters is because it tells us about who made it and what was used in making it; it reflects the quality of ingredients and skills used during preparation. It shows whether or not there is a balanced combination of fats, sugars, and air within the composition of ice cream. A good mix of dairy products, sweeteners, and emulsifiers prevents the crystallization of water, thus leading to a creamy texture.
Furthermore, creaminess improves flavor delivery in ice cream. The mouthfeel allows flavors to initiate from the tongue, intensifying the taste buds experience. This tends to harmonize with the richness associated with heavy sweet creams as well as sticky toppings, resulting in an overfilled feeling.
All things considered, this aspect accounts for ordinary taste changing into mouth-watering luxury, which leaves us wanting more.
Factors Made Known By Science: Smoothness
Now let’s move on to consider scientific factors that determine how creamy our homemade ice creams are going to be; understanding these allows you to control the outcome so that you get that desired velvet texture.
There are three primary contributors to a creamy ice cream base.
- Fat Content: Fat is responsible for creating smoothness in the mixture. It works as a barrier, preventing large ice crystals from forming and, as a result, making it rough and grainy in texture. The more fats contained in your dairy base (milk and cream), the more creamy your ice cream will be.
- Air Incorporation: Air bubbles formed by the churning of air into ice cream create a light, fluffy texture, which enhances the perception of creaminess. The key is to incorporate air effectively, achieving the right balance: too little air results in dense ice cream, while too much air creates a fluffy foam-like structure.
- Ice Crystal Formation: Creamy ice creams do not contain large ice crystal formations because they make them coarse in an icy sense. The secret lies in preventing the formation of ice crystals that are small and evenly distributed throughout your frozen treat.
Ingredients for Creaminess: Choosing Wisely
The choice of ingredients is important if you want to end up with a homemade creamier type of your favorite flavored ice cream or vanilla flavor for diet-conscious individuals. Here are some key ones:
- The Dairy Base: This is the foundation of your ice cream. For the richest consistency, go for dairy products high in fat content, like cheese or milk.
- Cream: Whipping, heavy, double, or sour cream (minimum fat content: 36%) is what you need here since it gives this treat its luxurious feel and creamy nature.
- Milk: When it comes to flavor, whole milk (at least 3.25% milkfat) is the best choice because it adds more volume as well as creaminess.
- Sweeteners: Besides tasting sweet, sugars also contribute to texture. Some sugars, such as corn syrup, assist in avoiding the formation of big ice crystals, which make a smoother texture.
- Emulsifiers and Stabilizers: Although not always required in ice cream making, emulsifiers and stabilizers can help create a creamy product by preventing fat separation and the growth of large ice crystals. Examples include egg yolks and commercial stabilizers.
Techniques for Creamy Perfection: Putting Theory into Practice
Now that you understand the science behind creamy ice cream, let’s explore some practical techniques to put this knowledge into action:
- Choose the Right Dairy Products: As mentioned earlier, an indulgent base is made from full-fat cream and milk; using low-fat or skimmed alternatives will yield less creamy results.
- Master the Art of Churning: To whip air into your ice cream base during churning, here are some tips:
- Start Chilled: Your ice cream mix should be chilled before churning to control crystal formation and provide better air incorporation.
- Churn Steadily: Keep up a steady pace when churning to incorporate the greatest amount of air possible.
- Know When to Stop: Over-churning can result in a foamy texture; churn until you reach the desired consistency and then stop doing it any further.
- Control Ice Crystal Formation:
- Freezing Method: Quick freezing helps achieve small ice crystals; this is why an ideal machine for making ice creams involves an ice-and-salt bath system.
- Additives for Smaller Crystals: To get a smoother texture, some ingredients, such as corn syrup or inverted sugar, can prevent the formation of large ice crystals.
- Flavor and Texture with Mix-Ins:
- Flavor Extracts: Fats without loss of creaminess can be added to your recipe by using extracts such as vanilla or almonds.
- Textural Elements: To create a contrast in mouthfeel on top of the smooth base, mix-ins such as crushed nuts, chocolate chips, or cookie dough can be added, but it is important not to do it too early. The churning process may break down nuts and other hard items, thus diminishing their textural appeal. During the final stages of churning, gently fold in your mix-ins, just enough to combine them evenly.
Advanced Techniques for Unparalleled Creaminess
Although the basic techniques and right ingredients are responsible for smoothness in ice cream, there are advanced methods that will take your creativity even further:
- The Power of Pre-Chilling: Before you start churring, freeze your ingredients as well as your apparatus. Consequently, there will be fewer ice crystals resulting from cold ingredients, which produce better air incorporation, leading to a smoother texture. Cooling may take approximately thirty minutes.
- The Richness of a Custard Base: Classic ice creams usually have a custard base. The eggs used in making it provide extra richness and creaminess. The cooking process of custard also thickens the mixture, thereby preventing large crystal formation.
- Why Age Ice Cream Base? Your ice cream will taste and feel much better if you let it age in a refrigerator for some time after churning. It thickens during this period, and the flavors mingle to produce a more delicious, creamy final product.
- Different Techniques of Churning: If you are an ice cream maker who likes challenges, there are so many different ways of churning that one can explore. While ice cream makers are convenient, doing it by hand allows for more control over the process of churning. Try different ways until you find your own preferred method.
From Icy to Airy: Dealing with Common Creaminess Issues
Even with the finest techniques, difficulties occur. This is how to solve common creaminess problems:
- Icy or grainy texture: It shows that there are large ice crystals present in it. Precool your ingredients even further; use a custard base or churn less to not over-churn instead.
- High Overrun (Airiness): Trying too hard when churning may lead to a high overrun texture. Be attentive to directions from your home machine and stop turning as soon as the thickness becomes what’s desired.
- Making Recipes Yours: You should not fear adjusting the fat content of your milk base. Nevertheless, others would rather consume something slightly less fatty than full cream; therefore, adjust accordingly. Bear in mind that fat content influences creaminess while modifying recipes based on your preferences.
- Learning from Every Scoop: Each batch of homemade ice cream tells a story that is usually incomplete without notes, whether they were written down or not, for future reference purposes. Did yours work better with any particular method? Did you have any flop flavor combinations? Exploit this information later when preparing your next serving.
Conclusion
The path towards making the smoothest homemade ice cream that you can think of is a satisfying one. Therefore, if you want to prepare ice cream that can rival those available in stores, learn how to manipulate texture based on scientific principles, use advanced methods, and correct some general problems. There is no harm in experimenting with different ideas or sharing your successes with friends who love this delicacy. Remember, there is always a perfect scoop for those bold enough to churn!